Equations
How Phasio pricing equations work, how to create, save and version them, and the part geometry and TypeScript you need to write one.
A pricing equation is a short TypeScript program that prices a part. Each process has its own customisable equation, and post-processes and the order-level pricing logic can have one too. When your team or customers upload parts, Phasio runs the live equations to calculate each part's unit price, its manufacturing duration, and any extra order line items. Equations connect through two mechanisms: done(), which records a part's result, and variable(), which exposes a value your team can override.
How equations run
Phasio runs three types of equation per order. Each level has its own job, and data flows down from one level to the next.
Order placed
  │
  ├─ Level 1: Process equation        ← runs once per line item
  │    done(unitPrice, duration?, reviewRequired?)
  │
  ├─ Level 2: Post-process equations  ← runs once per assigned post-process, per part
  │    done(unitPrice, duration?, reviewRequired?)
  │    sees processPricing from Level 1
  │
  └─ Level 3: Order-level script      ← runs once for the whole order
       addLineItem({ name, price })
       sees all parts and the subtotal
Process pricing (Level 1)
Runs once per line item. Receives the part geometry, material, customer, and order details. Returns a unit price.
Available: specification (including specification.material), requisition, revision, workflow, customer, variable(), createBands(), round(), useDimension(), done()
Not available: other parts in the order, post-process prices
Post-process pricing (Level 2)
Runs once for each post-process assigned to the part's process, for each part, whether or not the customer selected it. Only a selected post-process adds to the line's price and duration, and only a selected post-process can set the line's review flag. Has everything Level 1 has plus the Level 1 result.
Additional: processPricing.price, processPricing.duration, processPricing.variables
Level 2 done() supports the full signature: done(price, duration?, reviewRequired?)
Order-level pricing (Level 3)
Runs once for the entire order after all Level 1 and Level 2 equations complete. See Order-level pricing.
Available: parts (all line items that priced successfully), subtotal, customer, addLineItem(), createBands(), round(), useDimension()
Not available: done(), variable(), material, individual part geometry directly (access via parts[i].specification)
Unit price vs total price
This is the most common mistake. Phasio equations return a unit price. The platform multiplies by quantity automatically.
// ✅ Correct — return the price for ONE part
done(50.00)
// If quantity = 10, the order total for this line is €500

// ❌ Wrong — multiplying by quantity yourself
done(50.00 * quantity)  // at qty=10 this charges €5,000
The only time you use quantity in pricing arithmetic is when you're amortising a fixed cost across the order:
// Setup fee shared across all parts in this order
const setupCost    = specification.material.variables['setupCost']
const setupPerPart = round(setupCost / quantity, 2)  // ✅ this is correct
Completing the calculation with done()
done() must be called in every Level 1 and Level 2 equation run. If a run never calls it, the whole batch fails silently: at Level 1 no part in the quote that uses an equation gets a price, and at Level 2 the post-process options are dropped. See When an equation fails.
done() records the result but does not stop the equation. If it is called more than once, the last call wins.
done(price)                              // price only
done(price, durationHours)              // price + estimated production time
done(price, durationHours, true)        // price + duration + requires manual review
done(price, durationHours, condition)   // condition is a boolean expression
reviewRequired = true hides the line's price from the customer and blocks checkout until you click Approve for Purchase on the quote. In Phasio the part shows an orange warning icon with the tooltip "The part was flagged for review by your pricing algorithm." Use it for:
- Parts larger than your machines can handle
- Very thin walls or open meshes
- Unusual geometry or high removal ratios
- Post-processes that need manual colour approval
See Review-required gate for how the gate behaves and how you approve a flagged quote.
// Level 1 — gate oversized parts
const reviewRequired = length > 300 || width > 300 || height > 300
done(variable('unitPrice', unitPrice), duration, reviewRequired)

// Level 2 — gate unapproved colours
const APPROVED_COLORS = ['Black', 'White', 'Grey', 'Red']
const needsReview = !APPROVED_COLORS.includes(specification.color)
done({ price: variable('unitPrice', unitPrice), reviewRequired: needsReview })  // object form keeps workflow.duration
Overriding values with variable()
variable() exposes a value as an editable field in the Phasio quote UI. The operator can override the equation's calculated value before confirming a price.
// The equation calculates a default; the operator can change it in the UI
const machineTimeHours = variable('machineTime', round(calculatedHours, 2))
const unitPrice      = variable('unitPrice', round(baseCost, 2))
Mental model: think of variable() as an Excel cell. The equation provides a formula; variable() lets the operator type a new value into the cell for this part line.
Rules:
- Available at Level 1 and Level 2 only. Not at Level 3.
- Always wrap the final price:
variable('unitPrice', calculatedPrice) - Use it whenever an experienced operator would sometimes look at the calculated value and want to adjust it
- Variable values from Level 1 are readable in Level 2 via
processPricing.variables['name']
Passing values from process to post-process equations
Level 2 can read three things from Level 1:
processPricing.price- the unit price Level 1 returnedprocessPricing.duration- the duration in hours Level 1 returnedprocessPricing.variables- all values that Level 1 exposed viavariable()
// Level 1 — expose support volume for downstream use
const supportVolume = variable('supportVolume', round(calculatedSupport, 2))
done(unitPrice)// Level 2 — read Level 1 price and supportVolume
const partPrice = processPricing.price
const supportVolume = processPricing.variables['supportVolume'] / 1000 // mm3 -> cm3
const supportRemovalRate = variable('Rate per cm3', 1.50)
const unitPrice = variable('unitPrice', round(supportVolume * supportRemovalRate, 2))
done(unitPrice)Warning
Be careful with connecting Level 1 & 2 equations via the variables(), as this creates a dependency between the two. Use this feature only if overwriting a Level 1 variable should reflect in the Level 2 equations. A useful example is support volume.
Design rules
One rule: put logic at the lowest level that can see what it needs.
- Per-part geometry or material cost → Level 1
- Post-process cost that depends on part geometry or print time → Level 2
- Order-wide minimums, surcharges, shipping → Level 3
Never duplicate logic. If Level 1 calculated material cost, Level 2 shouldn't recalculate it. Pass it forward via variable().
Level 3 can only add line items. A line item with a negative price is a discount. Level 3 cannot change a part's unit price. If you need to discount a specific part, do it at Level 1 using customer?.organisationName or requisition.quantity.
Create an equation
Each process, each post-process, and the order-level pricing logic can have its own equations. Create the material variables your equation needs first, then write the equation.
| Level | Where to add it |
|---|---|
| Level 1 · Process | Settings > Manufacturing > Processes > [process] > Overview > Equation |
| Level 2 · Post-process | Settings > Manufacturing > Post-processing > [post-process] > Equation |
| Level 3 · Order-level | Settings > Finances > Payments > Order Pricing Logic |
To create a process equation:
-
Open Settings from the user menu, click Processes under Manufacturing, and open the process. Then click the Materials tab.
-
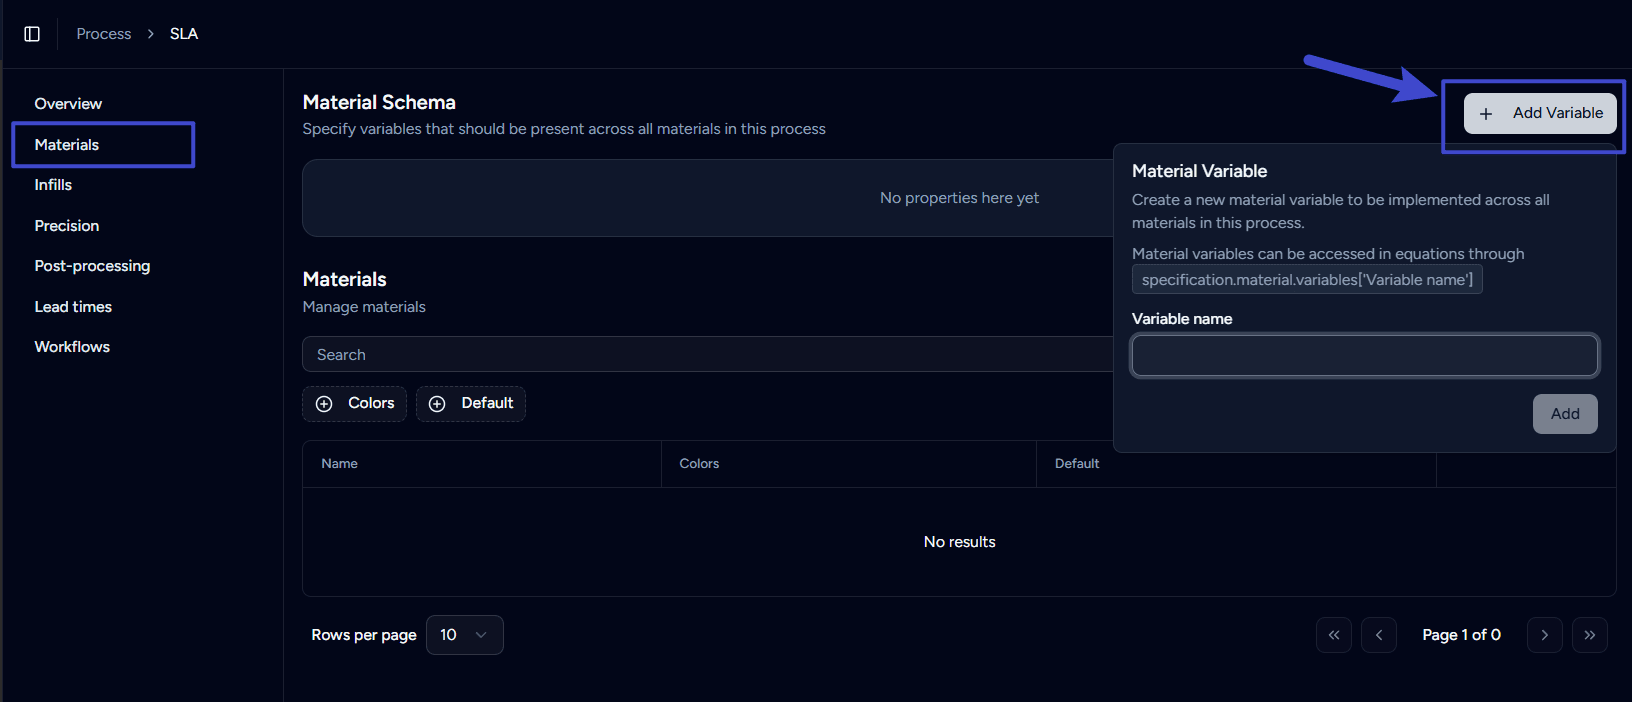
In the Material Schema section, click Add Variable. In the Material Variable popover, enter the Variable name and click Add. The variable is added to all materials in this process. Set its value on each material under Pricing variables.
-
After adding the necessary material variables, click the Overview tab, then click Create Equation in the Equation section to add a new equation.
-
Enter the Equation name in the field at the bottom of the screen.
-
Using the TypeScript equation editor, build your pricing formulas.
Use the equation editor to build pricing formulas with mathematical expressions. You can also reference properties such as:
- Material properties (density, cost, waste).
- Part characteristics (volume, surface area, complexity).
- Production inputs (machine time, labour).
- Business factors (margin, overhead).
Your equation reads each material variable with material.variables['name']. Saving the equation does not check that every material has a value: a missing value makes the price NaN, and Phasio stores a price of 0 with the review flag set. Create every variable on every material before going live.
A process needs a live equation
A process without a live equation shows a Draft badge and cannot be used for quoting, including quotes you create internally. If the process has no equations yet, its Overview tab warns: "This process can't generate quotes yet — a live pricing equation is required." For FDM, MJF, SLA, SLS, and CNC processes, the warning offers a Generate from [technology] template button, for example Generate from FDM template. It creates an equation from Phasio's template for that technology and sets it live. Use it as a quick starting point for your own custom equation.
Save and make an equation live
-
Click the Save button in the bottom right of the screen, after Cancel.
-
On the equation card, click the Mark as Live icon to apply this equation to all future quotes and orders using this manufacturing process. The live equation shows a Live badge.
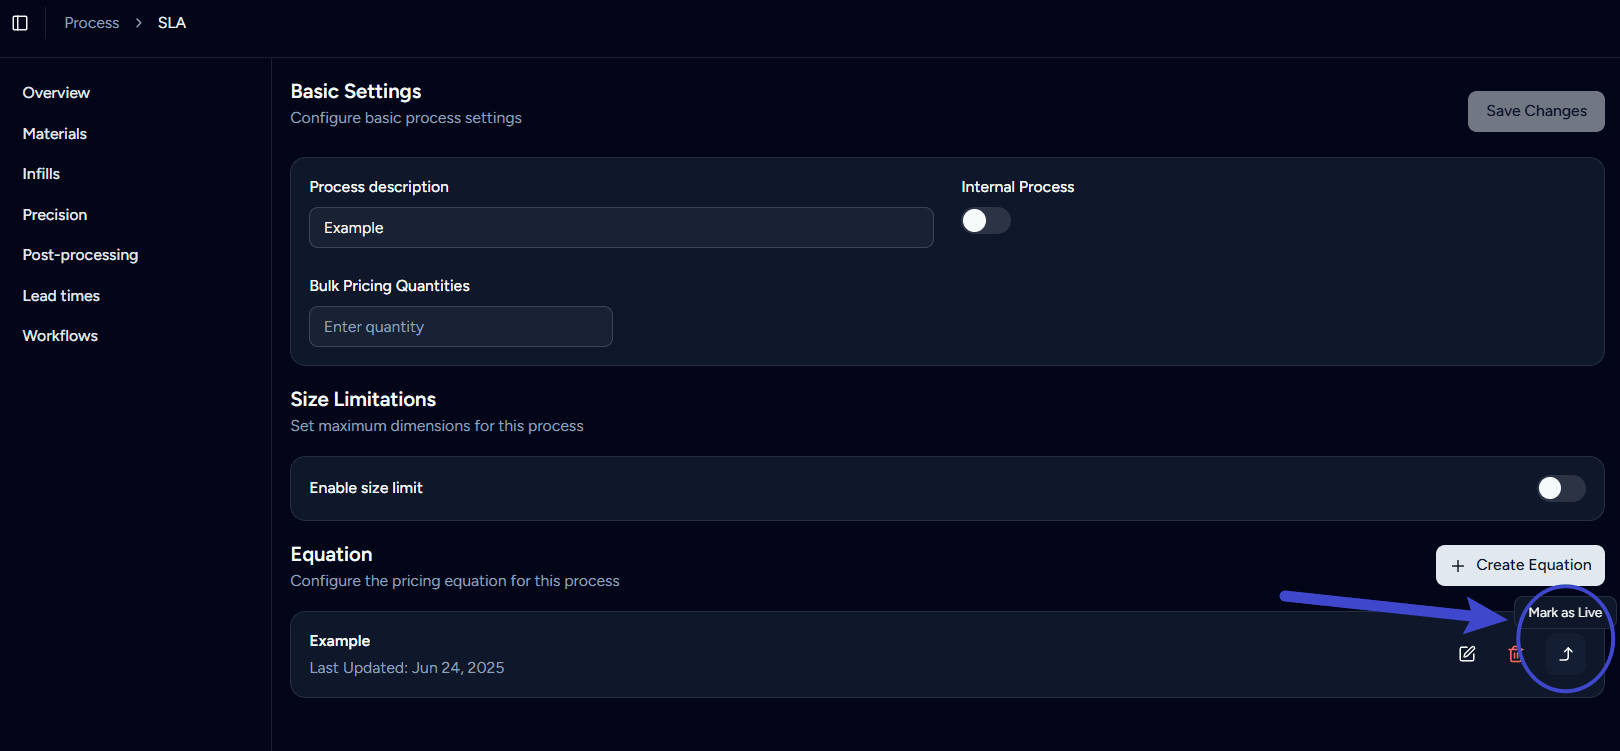
You can create multiple equations for the same process and choose which one is live on your Storefront. Phasio runs the equation that has the Live badge. To switch, click the Mark as Live icon on another equation.
View or restore an earlier version
Every time you save an equation, Phasio keeps it as a new version. This includes changes saved from the equation editor and changes made by an AI client connected through Phasio MCP. The equation card shows the current version number, for example v4. Equations on post-processing options and payment methods have the same history.
- On the equation card, click the History icon. The dialog lists every saved version, newest first, with who saved it and whether it came from the Editor or the AI assistant. The current version has a Current badge.
- Select a version to see what changed. By default it is compared with the version before it. Click Compare with current to compare it with the current version instead, or Compare with previous to switch back.
- To go back to the selected version, click Mark as latest. Phasio saves it as a new version, so nothing in the history is lost. If the equation is live, confirm with Mark as latest again, because your prices change immediately.
How equation changes reach quotes
A new live equation, or a new version of one, prices new quotes and orders, parts added to a quote, revised parts, and lines you update. It does not move the price on a quote your customer already holds: each quote line keeps the equation version that priced it, so restoring or editing an equation never changes a quote you have already sent.
A line priced with an older equation version shows an Older pricing marker, for example "This part is priced with an older pricing equation (v3; latest is v5)". If the order-level equation changed, the marker shows above the quote's price breakdown. To move a quote onto your latest equations, edit it and click Update to latest pricing on a line, or Update all to latest pricing. See Quotes.
Write equations with AI
There are two ways to get AI help with an equation:
- Paste the prompt from the Pricing Guide. The AI prompt gives ChatGPT, Claude or any other AI tool the full type definitions and rules. It interviews you about your costs, then writes an equation you paste into the editor.
- Connect an AI client to Phasio through the Model Context Protocol (MCP). A connected AI client can help create and refine equations for processes, post-processing, and order-level adjustments. Equations it creates are saved as non-live versions. Process and post-processing versions can be tested against real parts and compared with live prices, and you review and activate the version you choose in Phasio. Its versions show AI assistant in the equation's history. See MCP.
Part geometry
Phasio extracts geometry from every uploaded 3D file before your equation runs. This section explains what each value measures and how to use it in pricing.
| Property | Variable | Unit | Description |
|---|---|---|---|
| Volume | specification.volume | mm³ | Actual material volume of the part |
| Surface area | specification.area | mm² | Total outer surface area |
| Length / Width / Height | specification.length/width/height | mm | Axis-aligned bounding box dimensions |
| Min bounding box volume | specification.minBoundingBoxVolume | mm³ | Volume of the minimum bounding box |
| Convex hull volume | specification.convexHullVolume | mm³ | Volume of the tightest convex envelope |
| Shrink wrap volume | specification.shrinkWrapVolume | mm³ | Tight wrap that follows overhangs |
| Precision | specification.precision?.value | - | Price Multiplier of the precision option chosen by the customer. Null if not set. It is not a layer height |
| Infill density | specification.infill?.value | 0–1 | FDM infill fraction. Null if not set. Can be custom defined |
| Min wall thickness | specification.minWallThickness | mm | Thinnest wall. Null when the part has no wall thickness analysis (the Wall Thickness Check feature needs the Pro plan) |
| Watertight | revision.watertight | boolean | true = closed mesh, false = open mesh |
minBoundingBoxVolume, convexHullVolume, shrinkWrapVolume, and minWallThickness can be null for some parts. Check for null before you use them in arithmetic or comparisons: JavaScript treats null as 0.
For parts uploaded as an exact CAD model, Phasio also analyses manufacturing features and exposes them on revision. revision.machining holds CNC feature recognition (holes, pockets, setup estimates, finishing areas and warnings) and revision.bending holds sheet metal bend data (bend count, sheet thickness, flat blank area and bend geometry). Both are null for mesh uploads. See CNC machining for how to use them and the Reference for every field.
Choosing a volume
Choosing the right volume is the most important modelling decision in a pricing equation.
Actual volume - specification.volume
The real volume of material in the part. A hollow sphere has far lower volume than a solid one of identical dimensions.
Use for: material weight and cost in extrusion and vat processes (FDM, SLA, DLP). This is what you pay for in raw material.
const materialDensity   = specification.material.variables['materialDensity']   // g/cm³
const materialCostPerKg = specification.material.variables['materialCostPerKg']
const massGrams  = (volume / 1000) * materialDensity               // cm³ × g/cm³
const materialCost = (massGrams / 1000) * materialCostPerKg        // kg × cost/kg
Minimum bounding box volume - specification.minBoundingBoxVolume
The smallest axis-aligned box that contains the part. For a solid cube, this equals volume. For complex parts, it's always larger. The difference is wasted material.
Use for: CNC raw stock calculation - you buy the bounding box, then machine away everything that isn't the part.
const { volume, minBoundingBoxVolume, length, width, height } = specification
const stockVolume     = minBoundingBoxVolume ?? length * width * height  // can be null
const removedMaterial = stockVolume - volume
const removalRatio    = removedMaterial / stockVolume
// removalRatio > 0.90 means 90%+ of the raw stock is machined away — flag for review
const reviewRequired  = removalRatio > 0.90 || Math.max(length, width, height) > 300
Convex hull volume - specification.convexHullVolume
The smallest convex shape that contains the part. Imagine wrapping the part in a plastic bag and you pull tight on all ends, no indentations. The hull fills in all recesses, undercuts, and through-holes.
convexHullVolume - volume = the volume of those recesses. In FDM, this is where support structures live.
Use for: support volume estimation or complexity measures
const hullGap = (convexHullVolume ?? volume) - volume  // convexHullVolume can be null
const estimatedSupportVolume = variable('supportVolume', round(hullGap * 0.10, 0))
// 10% of the hull gap is a reasonable default support estimate
A low volume / convexHullVolume ratio signals a complex, concave part - lots of overhangs, holes, and internal channels.
Shrink wrap volume - specification.shrinkWrapVolume
Tighter than the convex hull, it wraps around overhangs and follows the part's surface more closely, without filling in recesses. For powder bed processes, this is the best proxy for how much build chamber space the part consumes.
Actual volume ≤ Shrink wrap volume ≤ Convex hull volume ≤ Min bounding box volumeUse for: MJF and SLS process pricing - the industry-standard metric for powder bed cost estimation.
const costPerCm3 = specification.material.variables['costPerCm3']
const partCost   = ((shrinkWrapVolume ?? volume) / 1000) * costPerCm3  // shrinkWrapVolume can be null
Volume ratios and what they reveal
| Ratio | What a low value signals |
|---|---|
volume / convexHullVolume | Many recesses, holes, undercuts → more support needed in FDM |
volume / minBoundingBoxVolume | High CNC waste, or complex shape with poor packing density |
shrinkWrapVolume / convexHullVolume | Significant overhangs that don't fill the hull |
// Example: flag high-waste CNC parts with a 20% premium.
// done() does not stop the equation, so decide first and call done() once.
const wasteRatio = 1 - (volume / (minBoundingBoxVolume ?? volume))
const highWaste  = wasteRatio > 0.85
const unitPrice  = variable('unitPrice', round(baseCost * (highWaste ? 1.20 : 1.0), 2))
done({ price: unitPrice, reviewRequired: highWaste })  // 20% premium + review

// Example: complexity premium for FDM
const convexityRatio = volume / (convexHullVolume ?? volume)
const complexityMultiplier = convexityRatio < 0.5 ? 1.15 : 1.0  // +15% for very complex parts
Surface area, wall thickness and watertightness
Surface area - specification.area
Surface area in mm² is the key input for shell volume in extrusion processes - the shell is printed by tracing the surface:
const NOZZLE_DIAMETER_MM = 0.4
const NUMBER_OF_WALLS    = 3
const shellVolume = Math.min(volume, area * NOZZLE_DIAMETER_MM * NUMBER_OF_WALLS)
For post-processes that coat or treat the surface (painting, plating, anodising), area often drives cost more directly than volume:
// Post-process (Level 2) — area-based coating cost
const { area } = specification
const ratePerMm2 = variable('Rate per mm²', 0.002)
const unitPrice  = variable('unitPrice', round(Math.max(5.00, area * ratePerMm2), 2))
done(unitPrice)
Wall thickness - specification.minWallThickness
The thinnest wall in the part, in mm. It is null when the part has no wall thickness analysis. The Wall Thickness Check feature needs the Pro plan.
Use it to gate fragile or unprintable parts before they reach production:
const MIN_WALL_MM = 0.8  // parts thinner than this risk failure in most FDM setups
const { minWallThickness } = specification
// null < 0.8 is true in JavaScript, so check for null first
const tooThin = minWallThickness !== null && minWallThickness < MIN_WALL_MM
done(variable('unitPrice', unitPrice), printTimeHours, tooThin)
Watertight flag - revision.watertight
true = closed (manifold) mesh. false = open mesh with holes in the surface.
An open mesh means volume calculations may be unreliable. Almost always flag for review:
const reviewRequired = !revision.watertight
done({ price: unitPrice, reviewRequired })
Reading TypeScript
A 5-minute primer. You don't need to write TypeScript - just read it well enough to understand what an equation is doing and tweak the numbers.
Constants and variables
const NOZZLE_DIAMETER = 0.4   // a constant — this value never changes in the equation
let   totalCost = 0           // a variable — can be reassigned later
In practice, pricing equations use const for almost everything. You rarely need let.
Numbers and arithmetic
const materialCost = massKg * pricePerKg   // multiplication
const setupPerPart = setupFee / quantity   // division
const total        = materialCost + machineCost + setupPerPart  // addition
const discounted   = total * 0.90          // 10% discount (multiply by 0.90)
Conditions
if (length > 300) {
  // this block runs when the part is longer than 300mm
} else {
  // this block runs otherwise
}
Conditions inside expressions:
const surcharge = quantity < 5 ? 1.20 : 1.00
// reads as: "if quantity < 5, use 1.20; otherwise use 1.00"
Destructuring
A shorthand for pulling multiple values out of an object:
// Long form:
const volume = specification.volume
const area   = specification.area
const length = specification.length// Shorthand (same result):
const { volume, area, length } = specificationYou'll see this at the top of almost every equation.
Optional chaining and fallbacks
Some values might not exist (the customer didn't set them). Two operators handle this:
precision?.value
// means: "get precision.value if precision exists; otherwise return undefined"

precision?.value ?? 1
// means: "get precision.value if it exists; if not (or if it's null), use 1"
You'll see this pattern a lot for infill?.value ?? 0.20 and precision?.value ?? 1. precision.value is the precision option's price multiplier, so the fallback is 1.
Functions
function selectMachine(length: number, width: number): string {
  if (length <= 250 && width <= 250) return 'Bambu X1 Carbon'
  // Else
  return 'Creality K1 Max'
}

// Call it like this:
const machine = selectMachine(length, width)
The part after the colon (: number, : string) is just a type label - it tells you what kind of value to expect. Ignore it when reading; it doesn't affect the logic.
Math functions
Math.max(5.00, calculatedPrice)  // returns the larger of the two
Math.min(500, calculatedPrice)   // returns the smaller of the two
Math.sqrt(quantity)              // square root
Math.log(quantity + 1)          // natural logarithm
Math.pow(base, exponent)         // base to the power of exponent
Math.ceil(3.2)                   // rounds up → 4
Math.floor(3.8)                  // rounds down → 3
Arrays and loops
const MACHINES = [
  { name: 'Small', maxDim: 250, costPerHour: 6 },
  { name: 'Large', maxDim: 500, costPerHour: 12 },
]

// Find the first machine that fits:
const machine = MACHINES.find(m => Math.max(length, width, height) <= m.maxDim)
find() goes through the array and returns the first item where the condition is true.
That's all the TypeScript you need. If you see something unfamiliar in an equation, it's almost certainly a variation of one of these patterns.
Last updated on
Pricing Guide
Automate pricing for any manufacturing process in Phasio using TypeScript equations that run the moment a part is uploaded.
Business logic
Model the commercial layer of a pricing equation: margins, safety floors, quantity discount curves, customer-specific rates and lead time multipliers.