Work Orders
Create work orders to put an order's parts into production, choose each run's routing, set start and due dates, and add or edit runs later.
Available to manufacturers on the Factory Floor plan
A work order, also called a production run, is one independent run of manufacturing a part. It has its own routing through your shop and its own quantity tracking. A single part can have several concurrent work orders, each tracked separately, so you can run a standard batch alongside a rush or inspection run without mixing their counts, or run the same part twice with different routings.
Creating a work order is how parts go into production: the part's quantity lands at the first operation of the work order's routing, where it appears in the Backlog.
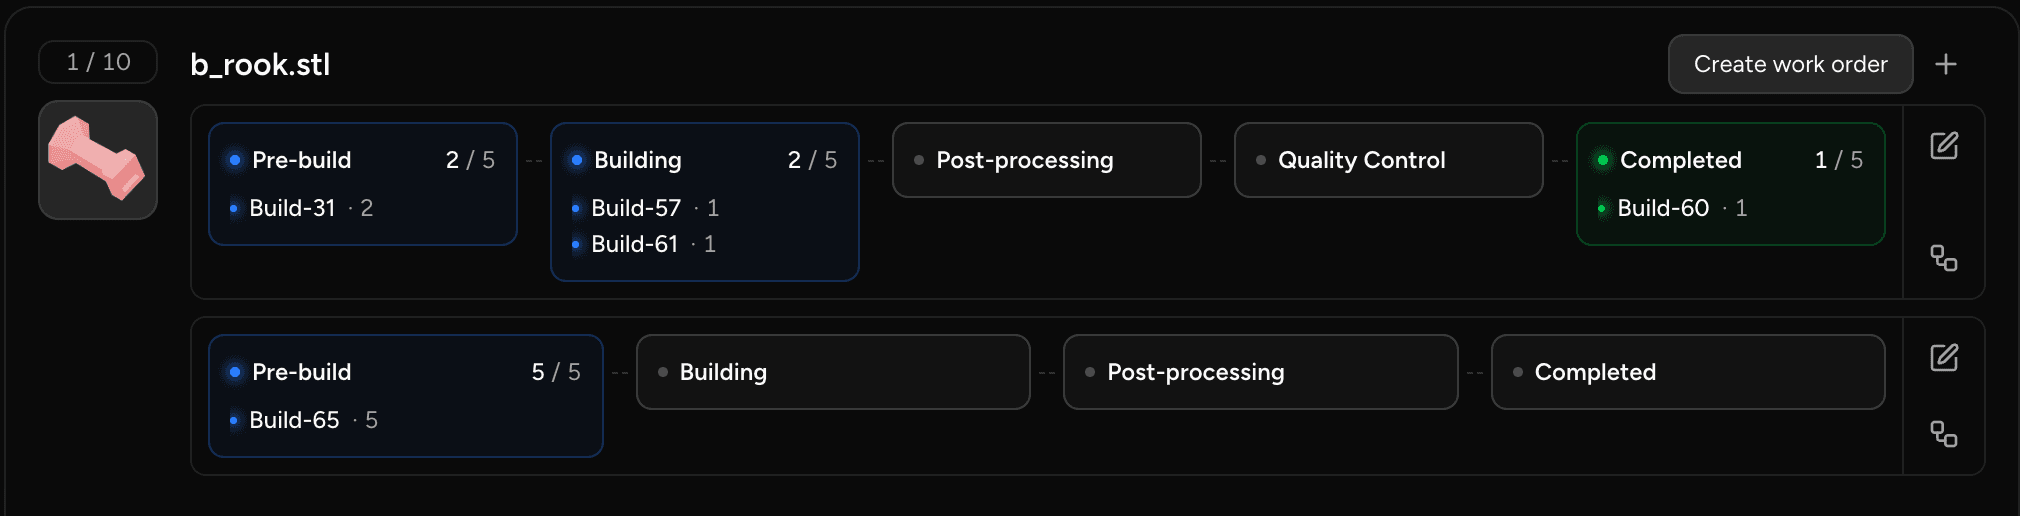
How work orders work
- Routing snapshot: when a work order is created, its routing is copied onto it. The routing comes from the part's default routing template, or is derived automatically from your process configuration. Later changes to a routing template or to the part's process configuration do not affect existing work orders. See How a work order gets its routing.
- Independent balances: as parts progress through operations, balances update on that work order alone. Each work order is tracked separately from start to finish.
- Dates: a work order can have a planned start date and a due date. A work order with a future start date stays out of the Backlog until that date, and the Backlog sorts work by the work order due date.
- Completion: a work order is complete when its units have passed the final operation of its routing. As parts reach it, the order's Production tab shows the completed and total quantity of each part, for example 3 / 4.
You see work orders on the order's Production tab, where each one has its own card. The orders list shows work order details too, so you can see which confirmed orders still need a work order. Backlog rows show the order reference alongside the planned work order dates, and with the production schedule each work order is laid out on a timeline.
Create work orders
When you're ready to move parts into production, the Create work orders dialog lets you set quantities, choose a routing and set dates for each part, all at once.
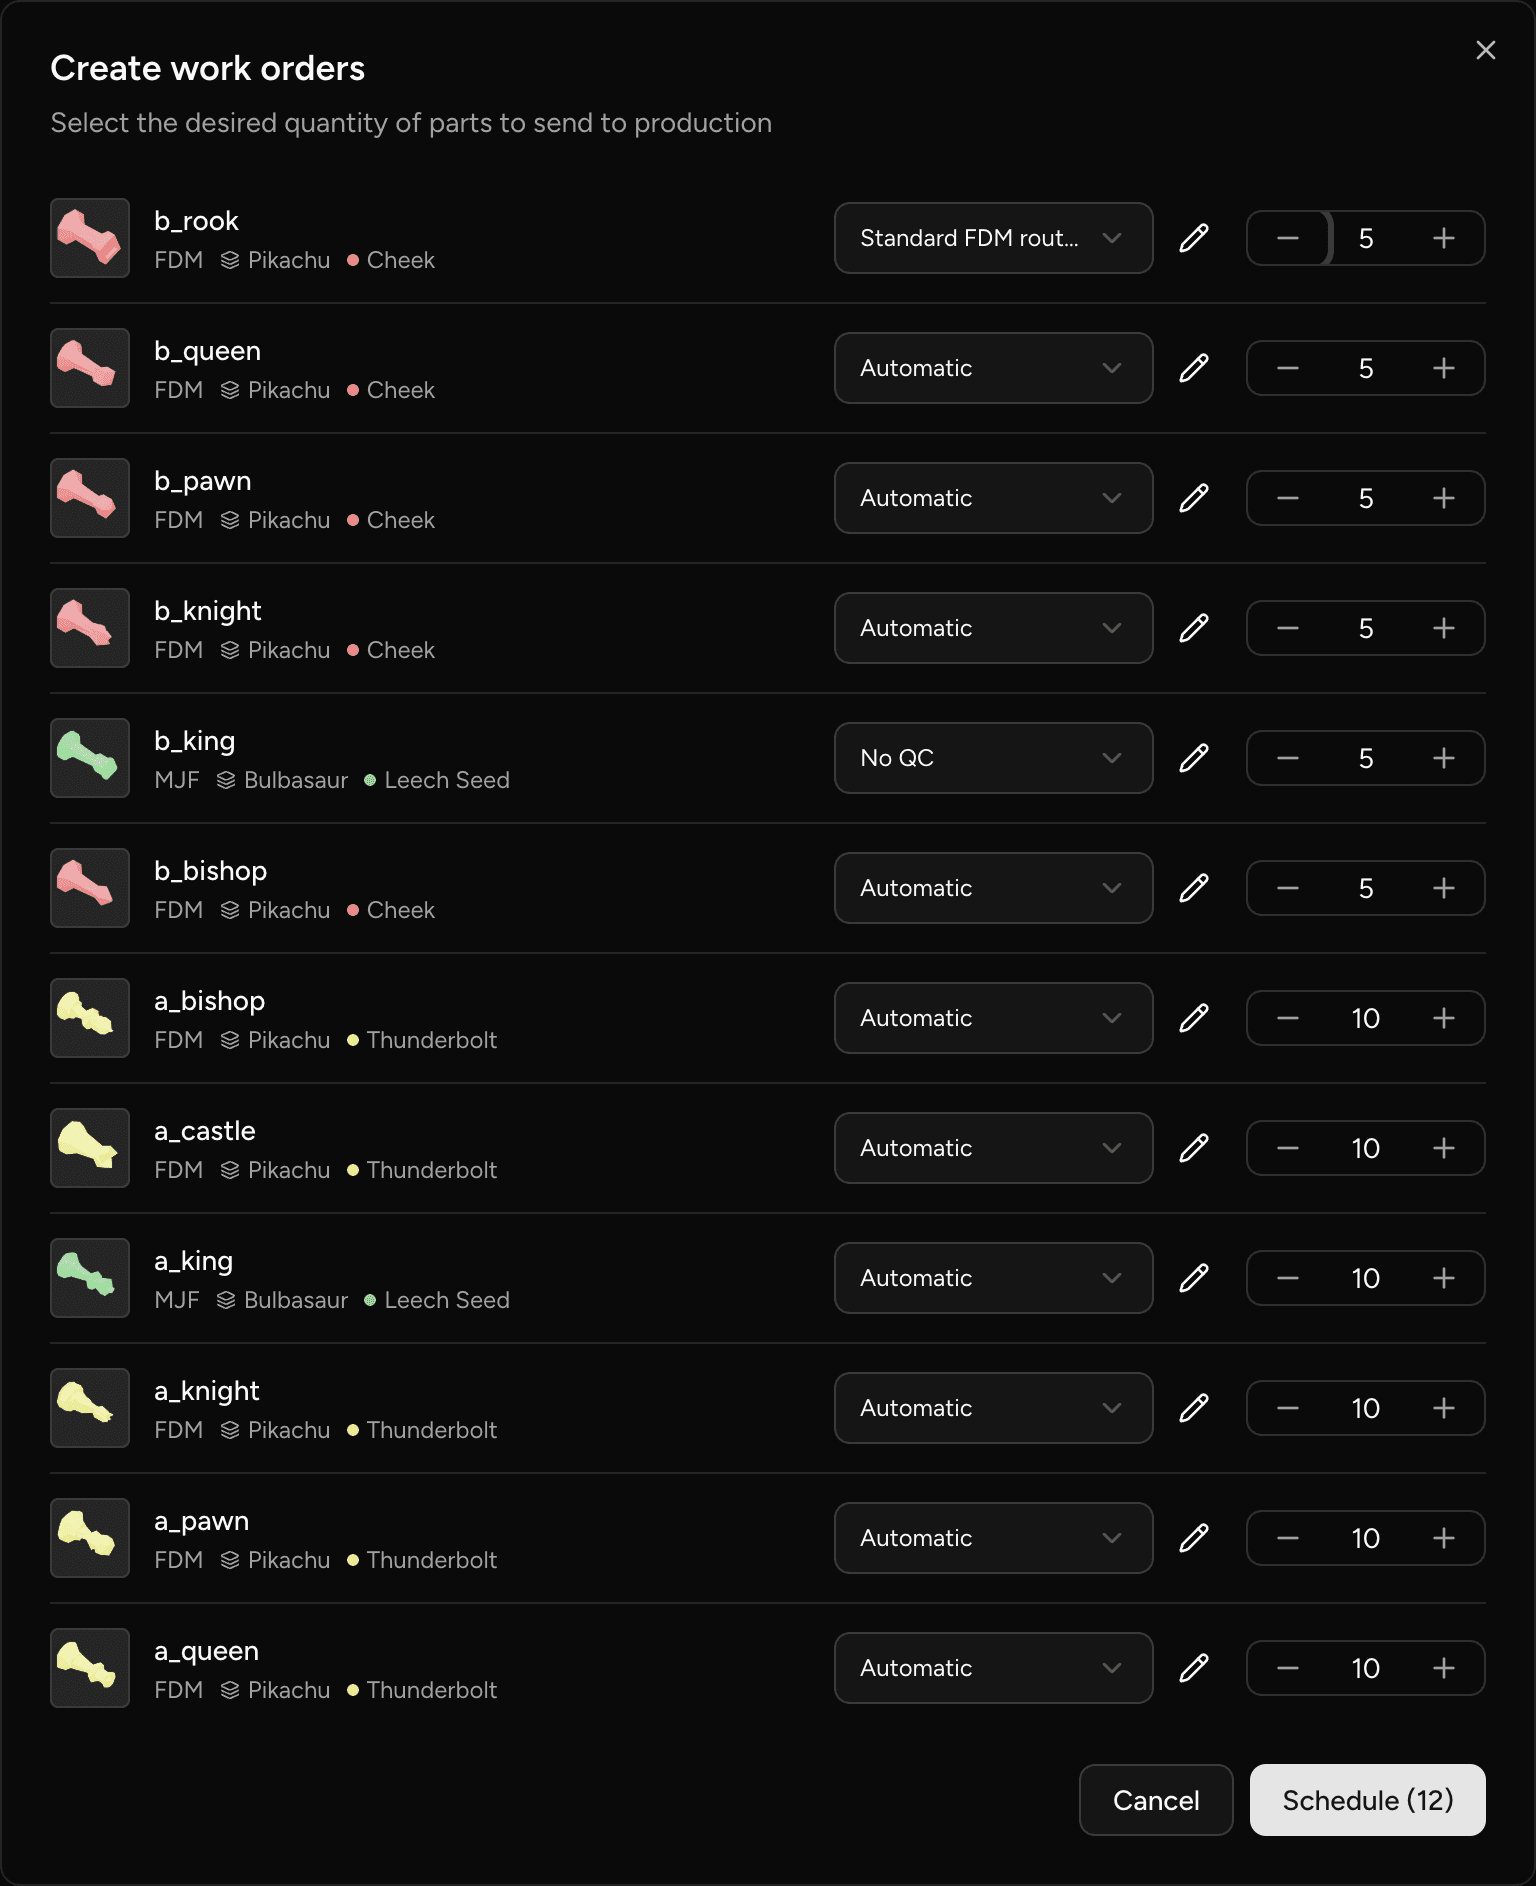
Open the dialog
- Open an order and go to the Production tab.
- Click Create work orders to open the Create work orders dialog.
The button appears on orders, not quotes, that have parts and are not archived. You can also select Create work orders from the orders list context menu, or right-click an order card on the board or the calendar.
Each row in the dialog represents one part on the order. For every row you can set a quantity and choose a routing template.
Choose a routing for each part
The routing template dropdown on each row controls which operations the work order follows. The options are:
- Automatic: Phasio derives the routing from your current process configuration. No template authoring required. Any operation you add to your process in the future automatically appears on the next run for that part.
- Any approved routing template on the part's specification that is not deprecated.
If the part has a default routing template, the dropdown preselects it. Otherwise, the dropdown defaults to Automatic. See Routing templates.
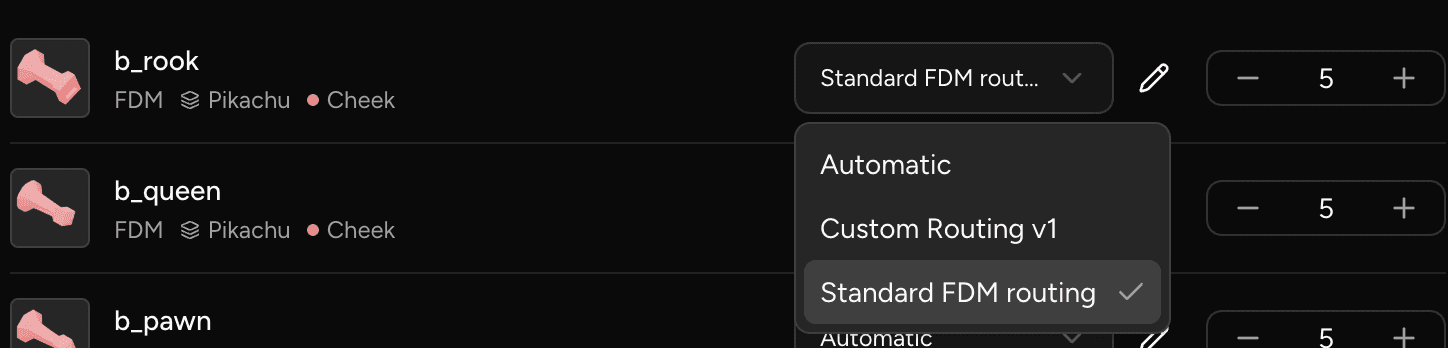
If the Require approved routing templates for production setting is on, Automatic is disabled and every part needs an approved routing template. See Routing template approval.
Customise a single run's routing
To adjust the operations for one work order without creating or changing a routing template, use the edit icon on that row to open the Edit routing steps editor. There you can add, remove or reorder the operations for this run only. Archived operations can't be selected.
When a row's routing has been customised this way, an Edited badge appears on it to show the run will follow a different routing from the selected template. Other parts and other runs are not affected.

After customising, select Save as routing template inside the editor, enter a Template name, and select Save template to save those operations as a reusable template on the part specification for future runs.
Set start and due dates
Below the rows, the dialog has a Start date and a Due date for all the work orders it creates:
- Start date defaults to Now. A work order with a future start date stays out of the Backlog until that date. Its card on the Production tab shows Starts {date}.
- Due date defaults to the Order dispatch date. If you pick a date, the work order is due at the end of that day. Its card shows Due {date}.
The Backlog sorts work by the work order due date, or by the order dispatch date when the work order has no due date.
Work order dates use your account's time zone, set under Settings > Workspace > General. Until it is set, each browser's own time zone is used.
Confirm and create work orders
Once quantities, routings and dates look correct, select Schedule (N), where N is the number of parts to schedule, to create a work order for each row. A "Scheduled parts" toast appears. Parts land at the first operation of their routing immediately, unless the start date is in the future.
Rows with a quantity of zero are skipped: no work order is created for that part.
Add another run for a part
To schedule an additional production run for a part that already has a work order, open the Create work orders dialog again from the Production tab and submit a new row for that part. Each submission creates a separate work order with its own routing and balance tracking. Existing runs are not affected.
To create a run for one part only, click Create work order (+) on that part in the Production tab. The Create work order dialog has a Quantity, a Start date, a Due date and a routing template.
When a part is scrapped with a replacement, the replacement doesn't create a new work order: it tops up the existing work order at its first operation. See Scrap parts.
Edit one run's routing after creation
To change the operations on a single work order after it has been created:
- On the Production tab, locate the work order card for that part.
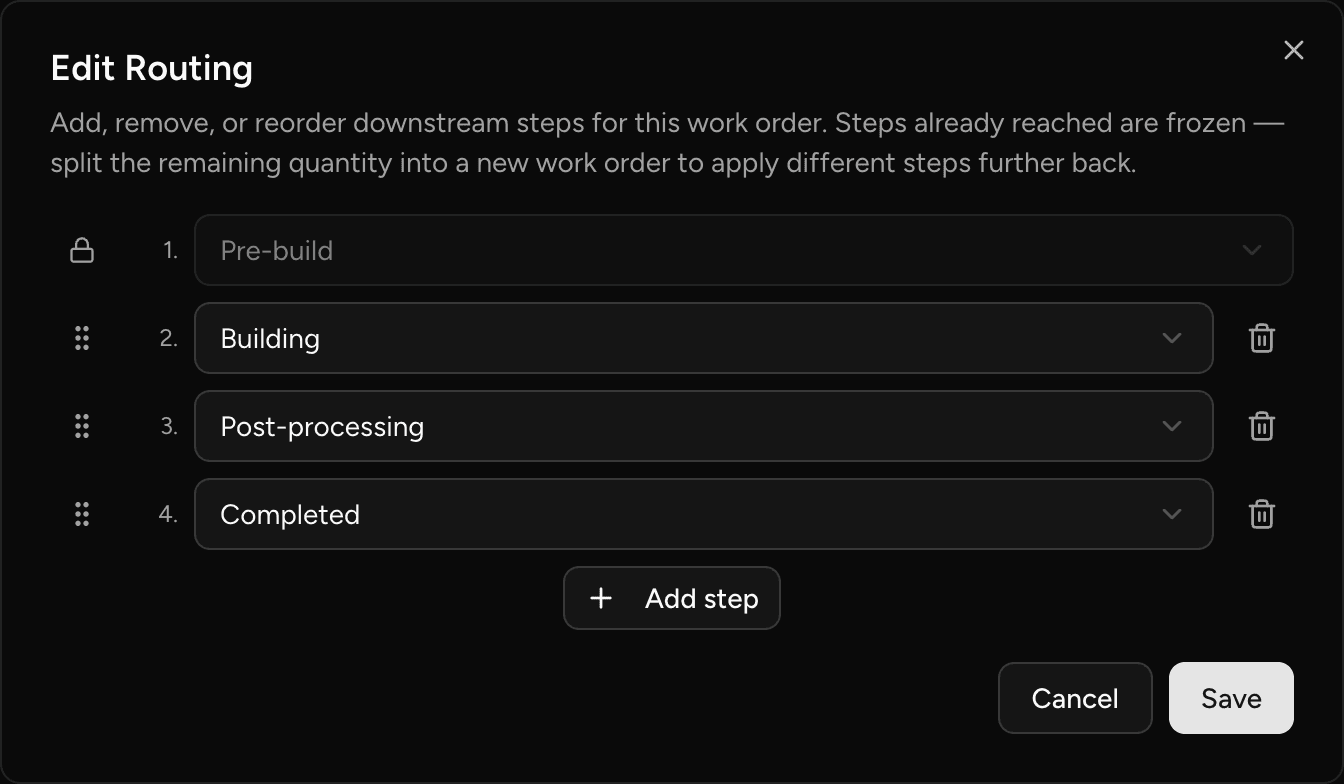
- Click the Edit downstream steps icon in the header of the work order card. The Edit Routing dialog opens.
Only operations the run hasn't reached yet can be edited. Steps already completed are frozen and show a lock icon. Changes apply to that work order only; other runs for the same part keep their own routing snapshots.
The Edit downstream steps icon is hidden while the Require approved routing templates for production setting is on.
Change a work order's dates
- On the Production tab, click the Edit start and due dates icon in the header of the work order card.
- In the Work order dates dialog, change the Start date or the Due date.
- Click Save.
You cannot move the start date of a work order into the future once its parts have started moving through the routing. Phasio shows "Work order #N has already started".
You can also change a work order's due date, and its priority, on the Work orders tab of the Schedule page, and see the effect on the plan before you apply it.
Update an order's status when production begins
It's a good idea to update an order's status to show that production has begun once a work order has been created. Phasio can do this automatically, so your board stays in step with the shop floor without anyone dragging a card:
- Locate the Work order creation status option under General settings.
- Select the target status to apply when the first work order has been created.
Orders only move into this target status if they are not already in that status and if there are no earlier work orders for any parts in that order.
Once an order has work orders, its Converted on date in the order sidebar can no longer be corrected. See Orders.
Last updated on
Build screen
Use the build screen to stage the parts of one group into outgoing groups and progress them to their next operation on the shop floor.
Backlog
Use the Backlog to track every production operation in real time, progress parts through each work order's routing, scrap parts and trace their history.