Build screen
Use the build screen to stage the parts of one group into outgoing groups and progress them to their next operation on the shop floor.
Available to manufacturers on the Factory Floor plan
The build screen is the operator's view of one group of parts at one step in production. It shows every part in the group, which work order each belongs to, and where each part is headed next. From it you decide where each unit goes, put units into outgoing groups, and commit the move, all without leaving the page. It is designed for gloved hands on a tablet such as an iPad: large tap targets, and no navigation needed mid-task.
Use the build screen whenever you need to move parts forward from one operation to the next, scrap units with a reason, or review what happened to a part after it moved.
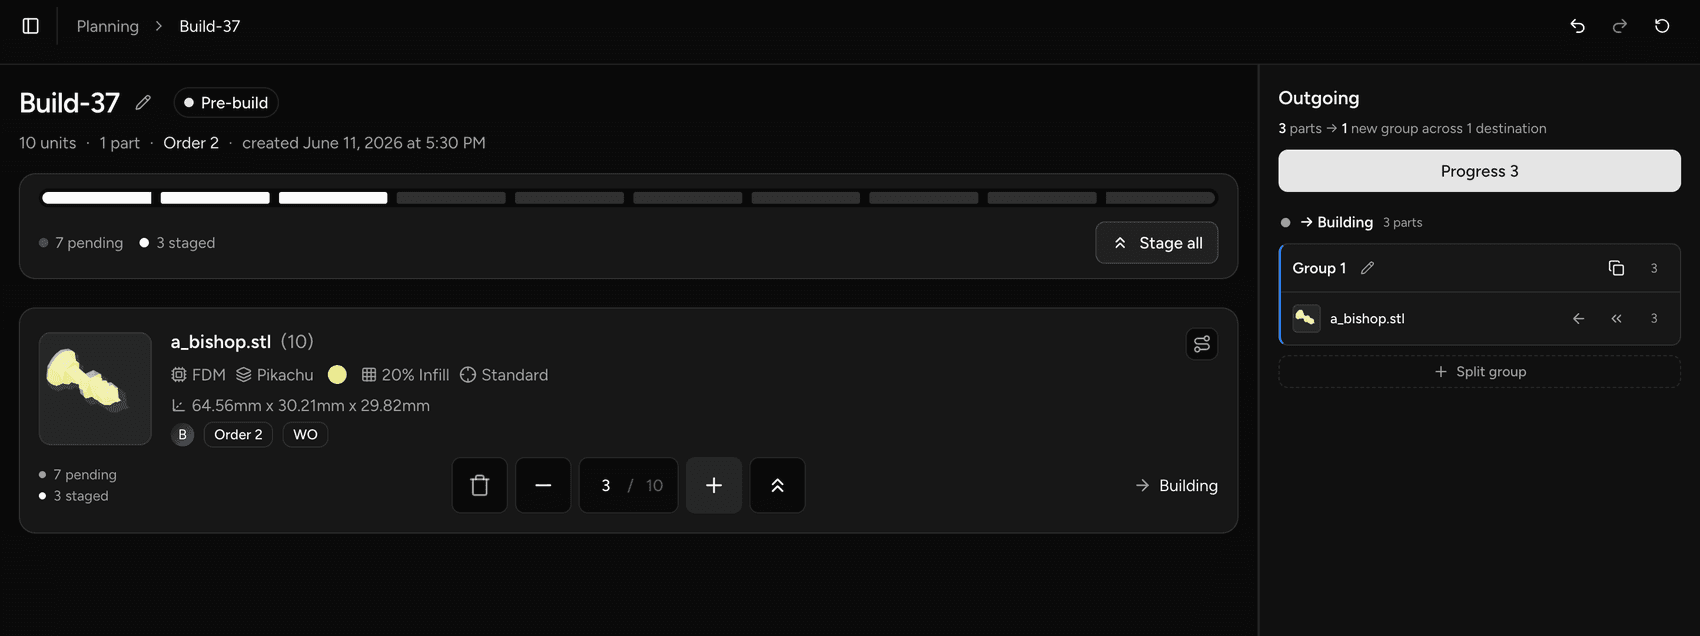
Open the build screen
You can open the build screen for a group in several ways:
- In the Backlog group view, click the group's name or the green Progress Group icon on a group, or right-click the group and select View Group.
- In the Backlog part view, click the group badge (for example
Build-1042) on a part. - In Production > Groups, click the row of the group.
- From a part's production trace, or from the Progressed section of another build screen, click a group name.
- On the Schedule page, click a job's bar and open its group.
Layout
The build screen has a main area on the left and the Outgoing rail on the right.
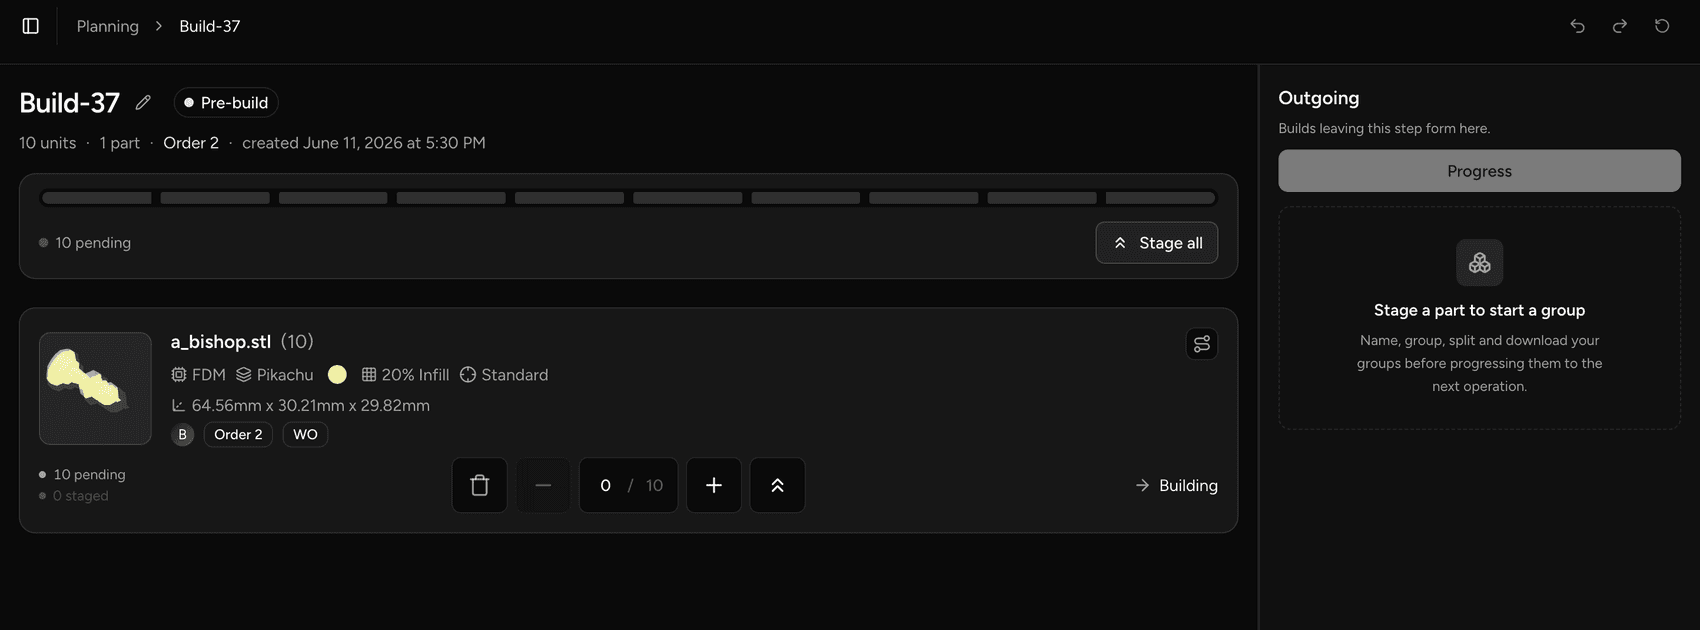
Group header and progress bar
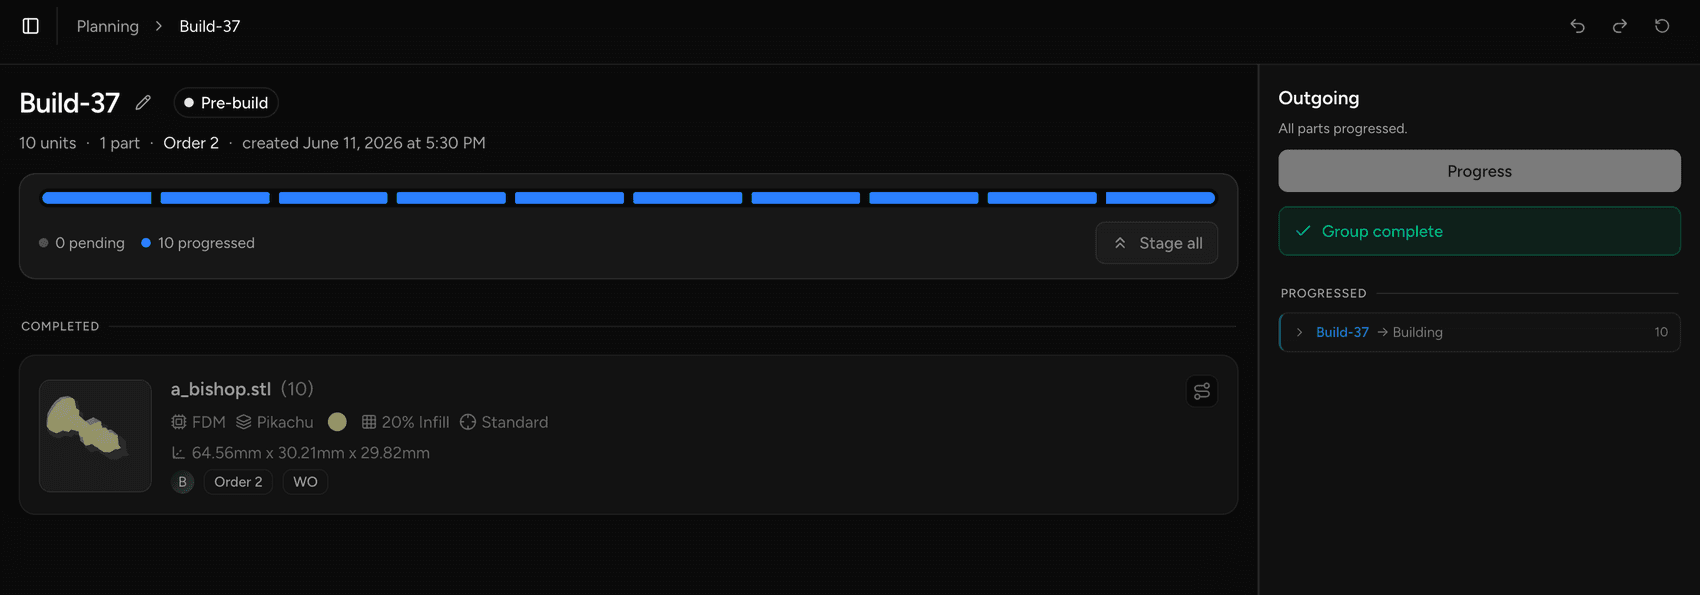
The header shows the group name, with a Rename group (pencil) icon, the operation, the number of units and parts, and the orders they belong to. Below it, a progress bar counts the units that are pending, staged, progressed and scrapped. Click Stage all to stage every pending unit at once.
The page header has Undo (⌘Z), Redo (⌘⇧Z) and Reset.
Part cards
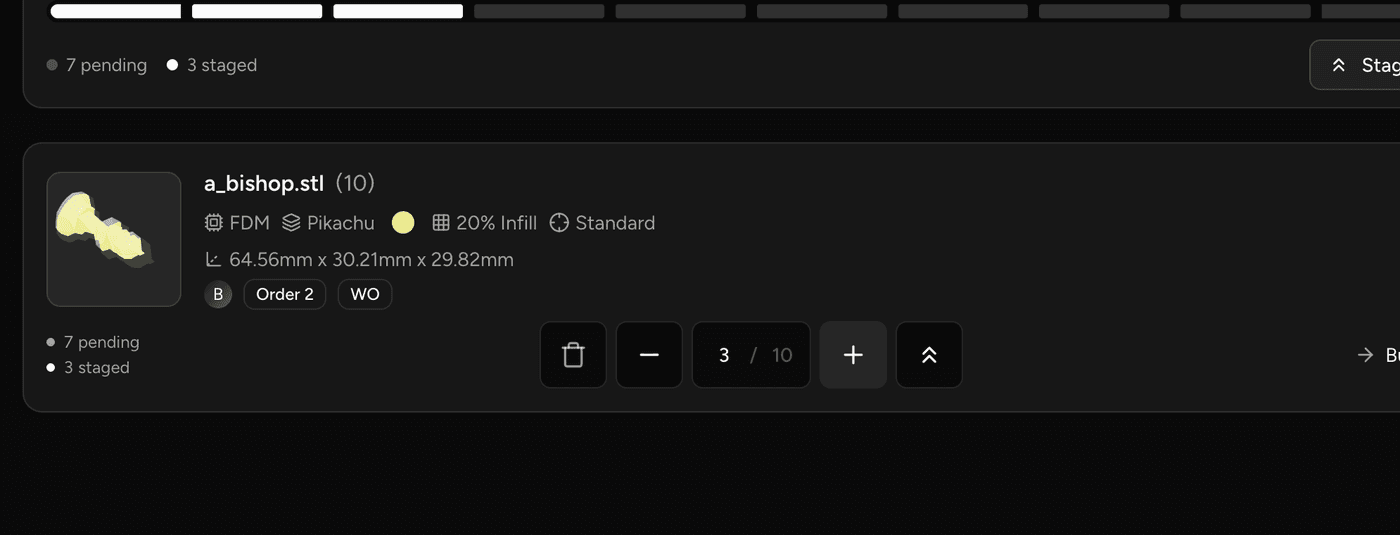
Each part in the group has a card showing the part, its order and work order, and one row of controls for each destination operation the part can move to next (for example → Post-processing). Use the row's controls to scrap (trash icon), unstage (−), stage (+), or stage all pending units, or type a staged quantity directly. Staging a unit takes it from the pending count; unstaging returns it.
- A part spanning several work orders gets one card per work order.
- Parts that have fully left this step move under a Completed divider.
- The external order reference stays visible once parts start progressing.
- With the production schedule, each part shows its rank in the schedule, for example #3.
Production instructions
When a part's specification has production instructions, its card shows them in a Production instructions box. The instructions for this operation and for all operations come first. Instructions for other operations are folded under a line such as "1 for other steps". Click Edit in the box to add, reorder, edit or delete instructions without leaving the screen, or Add production instruction when the part has none. Production instructions need the Factory Floor plan. See Add production instructions.
Outgoing rail
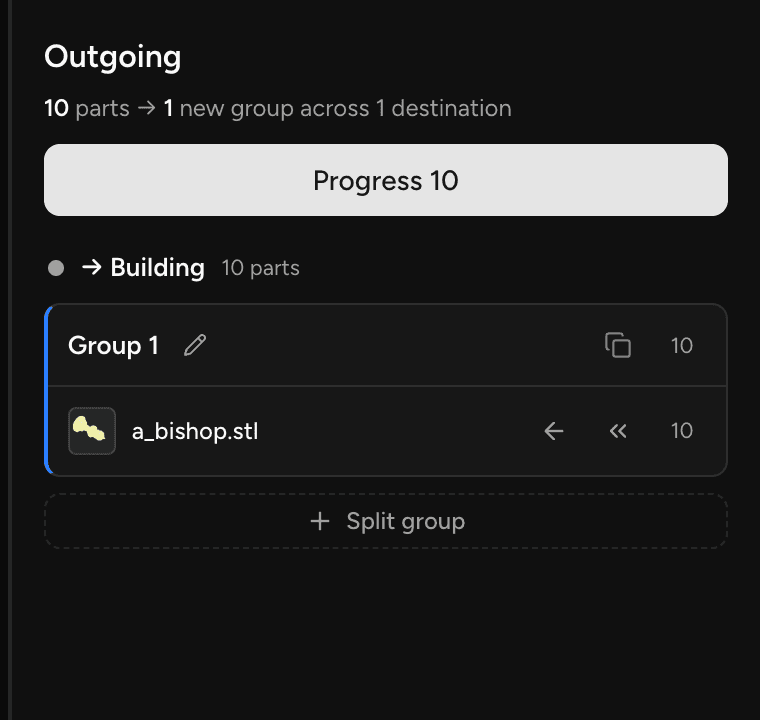
The Outgoing rail is where you organise outgoing units before committing. It has one lane per destination operation, labelled → {operation}.
- Phasio creates a group in a lane as soon as you stage a part for that destination. To keep parts for the same destination apart, click Split group to start a second group in that lane.
- You can rename each staged group.
- When the destination operation's step type is Download Parts as Group or Upload Bill of Parts, you can also download the group.
- Below the lanes, the Scrapped section lists units you scrapped, and the Progressed section lists the groups and scraps already committed from this step.
Whether a group's name carries forward to the next step depends on the destination operation's naming strategy. A partial move, or an operation set to always rename, replaces the name with a fresh one. See Group naming.
Stage parts
Staging moves a part quantity from the pending pool into a group in the Outgoing rail. Staging happens in memory only: nothing is written until you progress.
Stage an individual part
- On the build screen, locate the part you want to stage. Each part card has one row of controls per destination operation.
- In the row for the destination operation, click + (Stage) to stage one unit, or type the quantity in the Staged / Available field (for example
3 / 10) and press Enter. To stage every available unit for that destination, click Stage all (double chevron) on the row.
Staged units land in the active group for their destination in the Outgoing rail.
If a part's full quantity spans several source steps, for example parts from two work orders filling the same slot, Phasio splits the quantity automatically: one chunk per source step.
Stage all parts
- Click Stage all in the progress bar at the top of the build screen. Each part is staged to its own next operation. If some parts cannot be staged, Phasio lists every one of them.
- Review the resulting groups in the Outgoing rail before progressing. Staging all is reversible.
Staged changes are held in memory and can be undone freely before you click Progress. Use Undo (⌘Z) and Redo (⌘⇧Z) in the page header, or Reset to discard everything staged on the screen. You can also adjust group names or move units back to pending.
Name and split groups
Groups are created automatically as parts are staged, named Group 1, Group 2, and so on until you name them. To name a group, click the pencil (Rename group) on its card in the Outgoing rail, type a name (letters, numbers, hyphens and underscores only), and confirm with the check mark or Enter.
To keep parts headed to the same operation in separate groups, click Split group under that destination. This starts a new group and makes it the staging target; click a group card to make it the target instead.
Remove a staged part
To pull a part back out of a group before progressing, do one of the following:
- On the part's row, click − (Unstage) or lower the number in the staged field.
- On the staged group in the Outgoing rail, click Unstage one (left arrow) or Unstage all (double left arrow) for the part.
The quantity returns to the pending pool. If the last batch is removed, the group entry is dropped automatically.
Upload a nested build file
When the next operation of the parts has the Upload Bill of Parts step type, you can upload a nested .3mf file to stage its parts instead of staging them one by one.
- Drag the
.3mffile anywhere onto the build screen and drop it on the Drop a nested .3mf to stage its parts overlay. You can also click the Upload Bill of Parts (upload) icon at the top of the Outgoing rail, or Upload .3mf while the rail is empty, and select the file.
The parts in the file are matched to this group's pending units and staged into a new group per destination. Parts that can't be matched are listed on the group card as N parts could not be matched.
The upload also accepts a .csv bill of parts. It does not accept .gcode files.
The upload is only available when at least one pending part's next operation has the Upload Bill of Parts step type. The step type of the current operation does not matter. See Step Type.
Progress staged parts
Progressing commits all staged groups and scraps to the production ledger and advances each part to its next operation. This is the only step that writes durable data.
- Confirm your staged groups look correct: names, quantities and destinations.
- Click Progress N at the top of the Outgoing rail, where N is the number of staged units. The button is disabled until something is staged or scrapped, and does not appear on the final operation.
The page updates in place: the committed groups move to the Progressed section of the Outgoing rail (each links to its new build screen), and the units are removed from the pending pool for this operation. Units that were scrapped during staging are committed at the same time. Parts with nothing left to move drop under a Completed divider. Open a part's production trace to see where its units went.
Each part must move to its strict next operation: you cannot skip a stage. On the build screen, the staged quantity is always capped at the part's pending units. The operation-level Allow Overproduction setting applies to the Backlog, not this screen.
Scrap parts and trace history
You can scrap units from the build screen with the trash icon on a part's row, with an optional replacement and reason. Each part card also has a Production trace icon that shows every move the part has made. Both are described in Backlog.
How it relates to the Backlog
A part's quantity starts at the first operation of its work order the moment the work order is created. The build screen's pending count always reflects the current live balance of the group at that operation: the units that have arrived but not yet moved on. When you progress, those units leave this step and appear in the new group at the destination step.
Each work order tracks its own balance independently. If the same part has two concurrent work orders, both appear as separate part cards and are staged and traced separately.
Completed state
A work order's operation is marked complete when all of its units have left that step, either progressed forward or scrapped.
Work orders track completeness per operation. A run is not marked done until units have passed the final operation. Partial progress through the routing leaves earlier operations complete while later ones remain open.
The build screen shows these states:
- If the group holds no parts, the progress bar reads "Nothing in this group".
- When nothing is staged or scrapped yet, the Outgoing rail reads "Stage a part to start a group".
- When every unit has been progressed or scrapped, the pending pool is empty and the rail shows a green Group complete banner and "All parts progressed." Groups and scraps already committed from this step remain listed under Progressed with their trace.
- On the final operation of a routing, nothing can be staged or progressed: the rail reads "This is the final operation — nothing leaves this step.", staging controls are disabled, and the progress bar counts the units as completed.
Last updated on