Backlog
Use the Backlog to track every production operation in real time, progress parts through each work order's routing, scrap parts and trace their history.
Available to manufacturers on the Factory Floor plan
The Backlog is your production team's command centre. Found under Production > Backlog, it gives a real-time, visual overview of all your operations and the parts at each one. Every part in the Backlog belongs to a work order with its own routing, a sequence of operations that runs independently from other work orders for the same part.
From the Backlog you can:
- Track progress across all of your operations in real time.
- Move parts through each operation in a work order's routing with full visibility and control.
- Scrap parts and schedule replacements.
- Trace every move a part has made through your shop.
Backlog layout
To open the Backlog, go to Production > Backlog in the main sidebar.
The Backlog shows all operations as an expandable accordion. Each operation is a row with the operation name and the number of parts assigned to it. Click a row to expand it and see the parts or groups at that operation.
- Parts appear at the first operation of their work order's routing once the work order is created. A work order with a future start date stays out of the Backlog until that date.
- Work is sorted by the work order due date, or by the order dispatch date when the work order has no due date. Rows show the order reference alongside the planned work order dates, and an urgency indicator based on the dispatch date makes time-critical parts easy to spot.
- With the production schedule, each part shows its rank in the schedule, for example #3. Hover over it to see where the plan takes that work order, then click Show in the schedule.
- The Completed operation lists work completed in the last 30 days. Click Load more to see older work.
- An archived operation keeps showing, with an Archived badge, until no live parts or unfinished work orders use it.
Part view and group view
The Backlog has two display modes:
- Part View shows individual parts with full detail, including thumbnails, order numbers, material specs and customer. Use it to manage parts one by one with complete traceability. A green Production file icon shows that the part's specification has a production file. An instructions badge shows how many production instructions apply at that operation. Hover over either icon for details.
- Group View shows the groups of parts that are processed together. It focuses on batch management, with group-level data such as total part count, unique geometries and shared material specifications.
Each operation row has a toggle to switch between View Parts and View Groups. The default view for each operation is its View Type setting. See Operation settings.
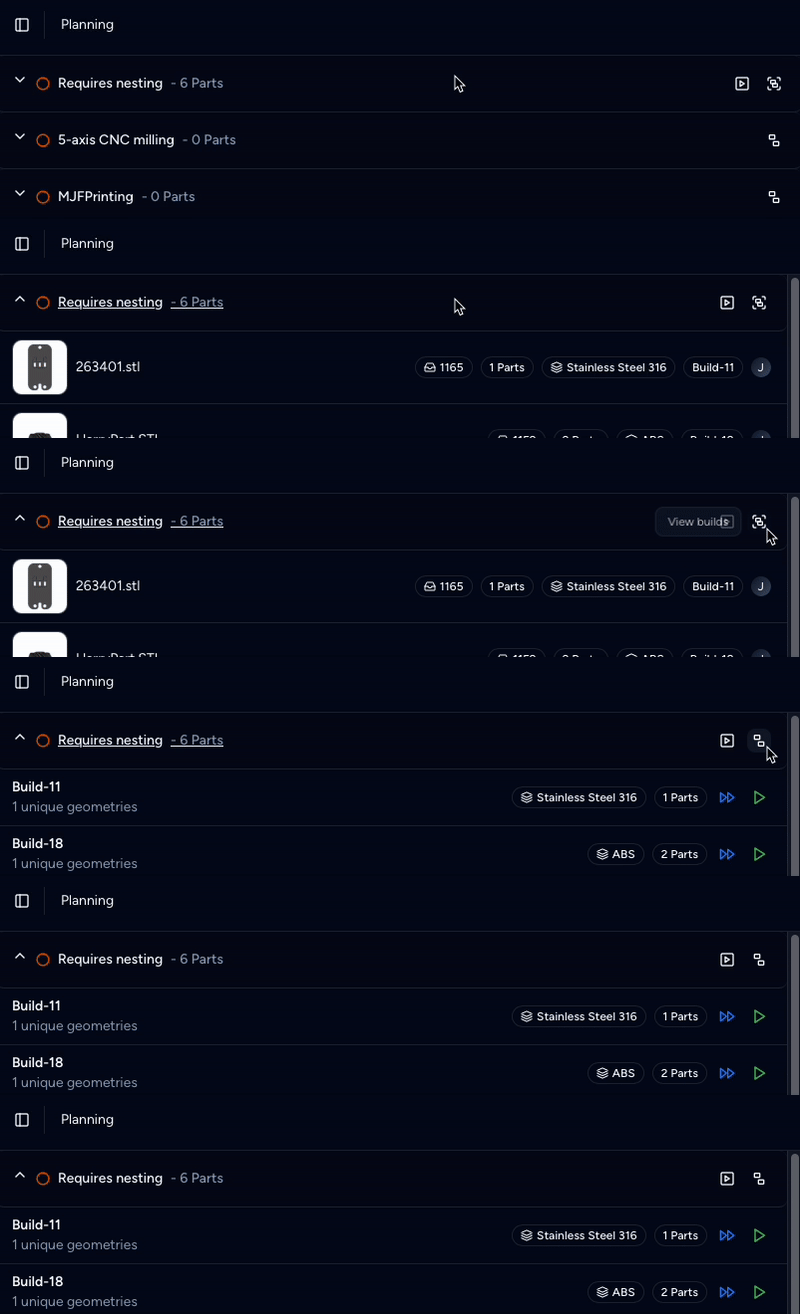
In the group view, right-click a group to View Group on its build screen, Rename it, or Scrap the whole group.
Progress parts
Progressing moves parts from one operation to the next operation in their work order's routing. Each part moves to its strict next operation; you cannot skip a stage.
Step 1. Stage parts for the next operation
In Part View
-
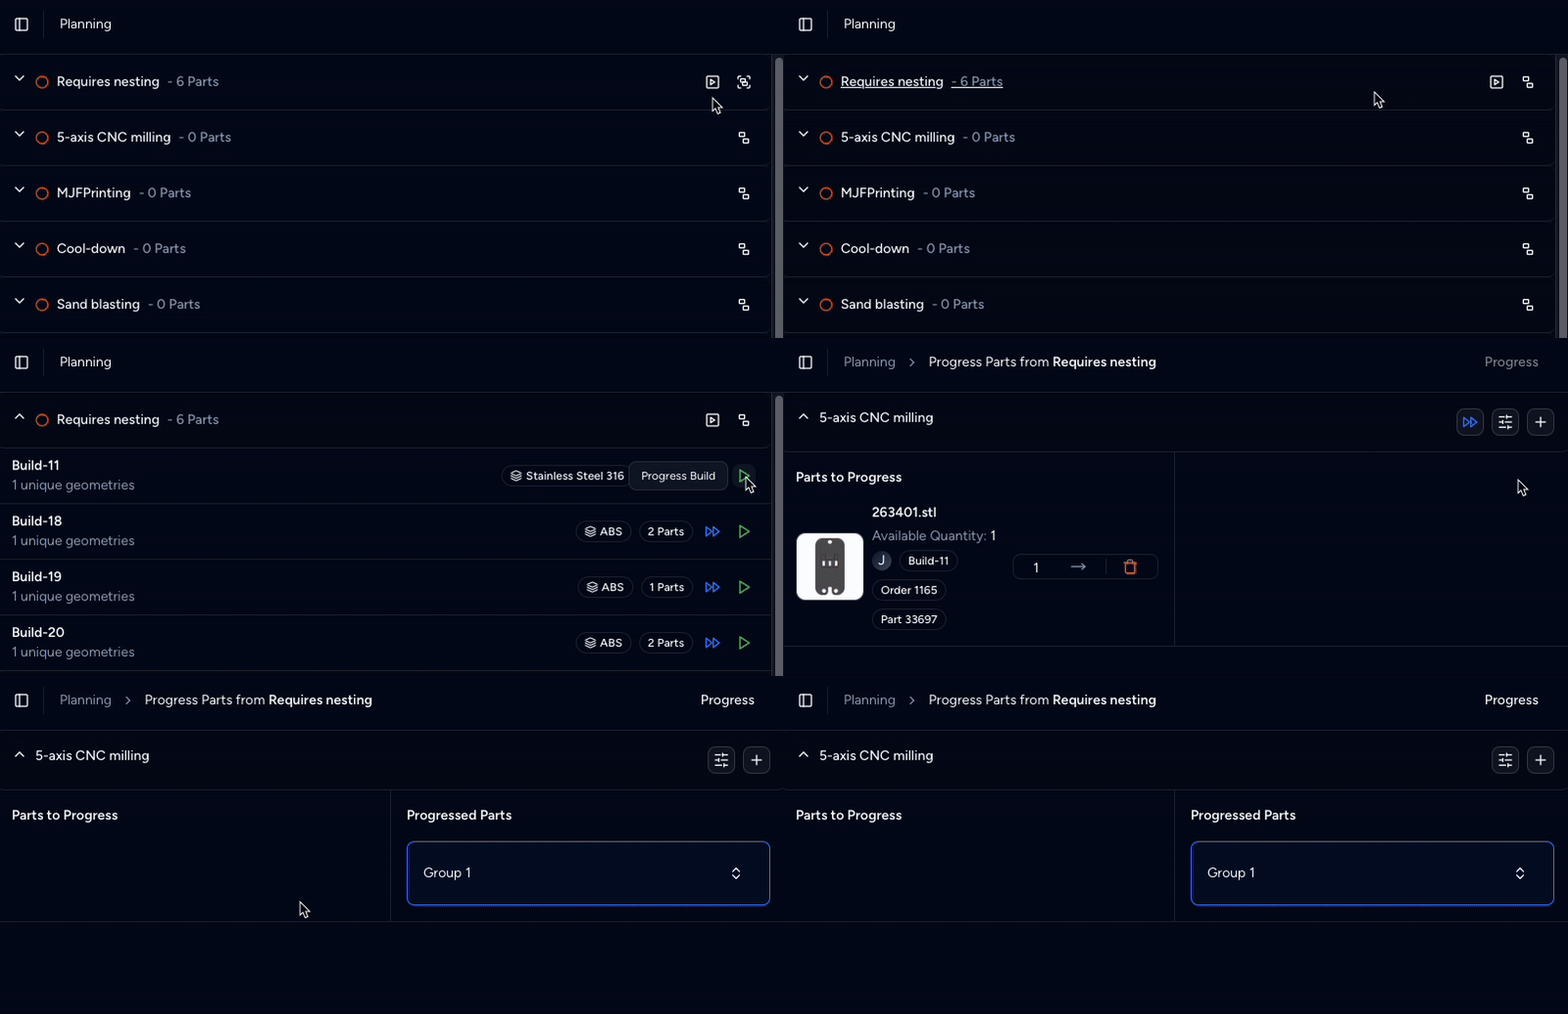
Click the Progress icon [▶] on an operation row to open the progress screen. The icon appears when the operation has parts waiting and is not the final station.
The progress screen has one lane per next operation. Each lane lists the parts waiting to move on the left, under To-do, and the parts you have staged on the right, under Staged.
-
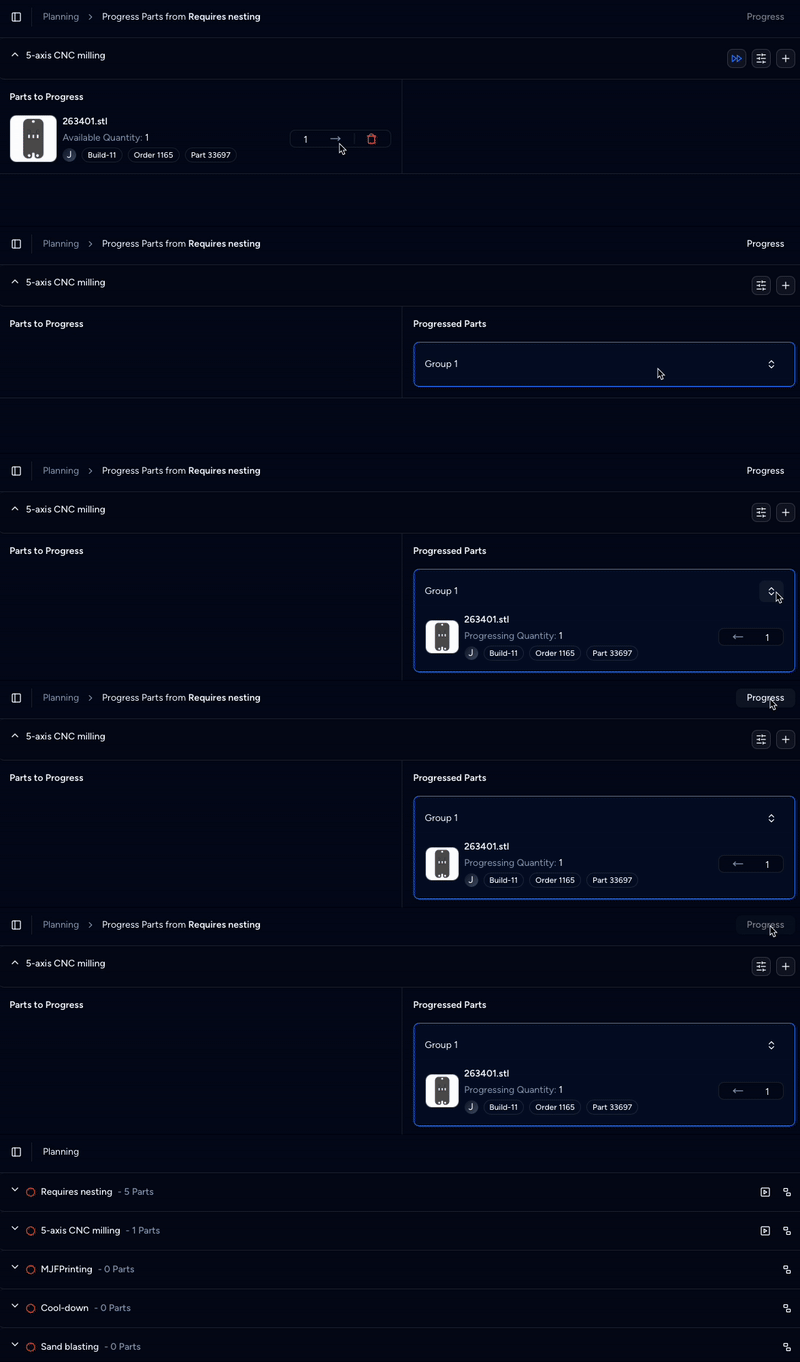
Enter the quantity to move, then click the arrow icon [→] (Stage N parts) next to the part.
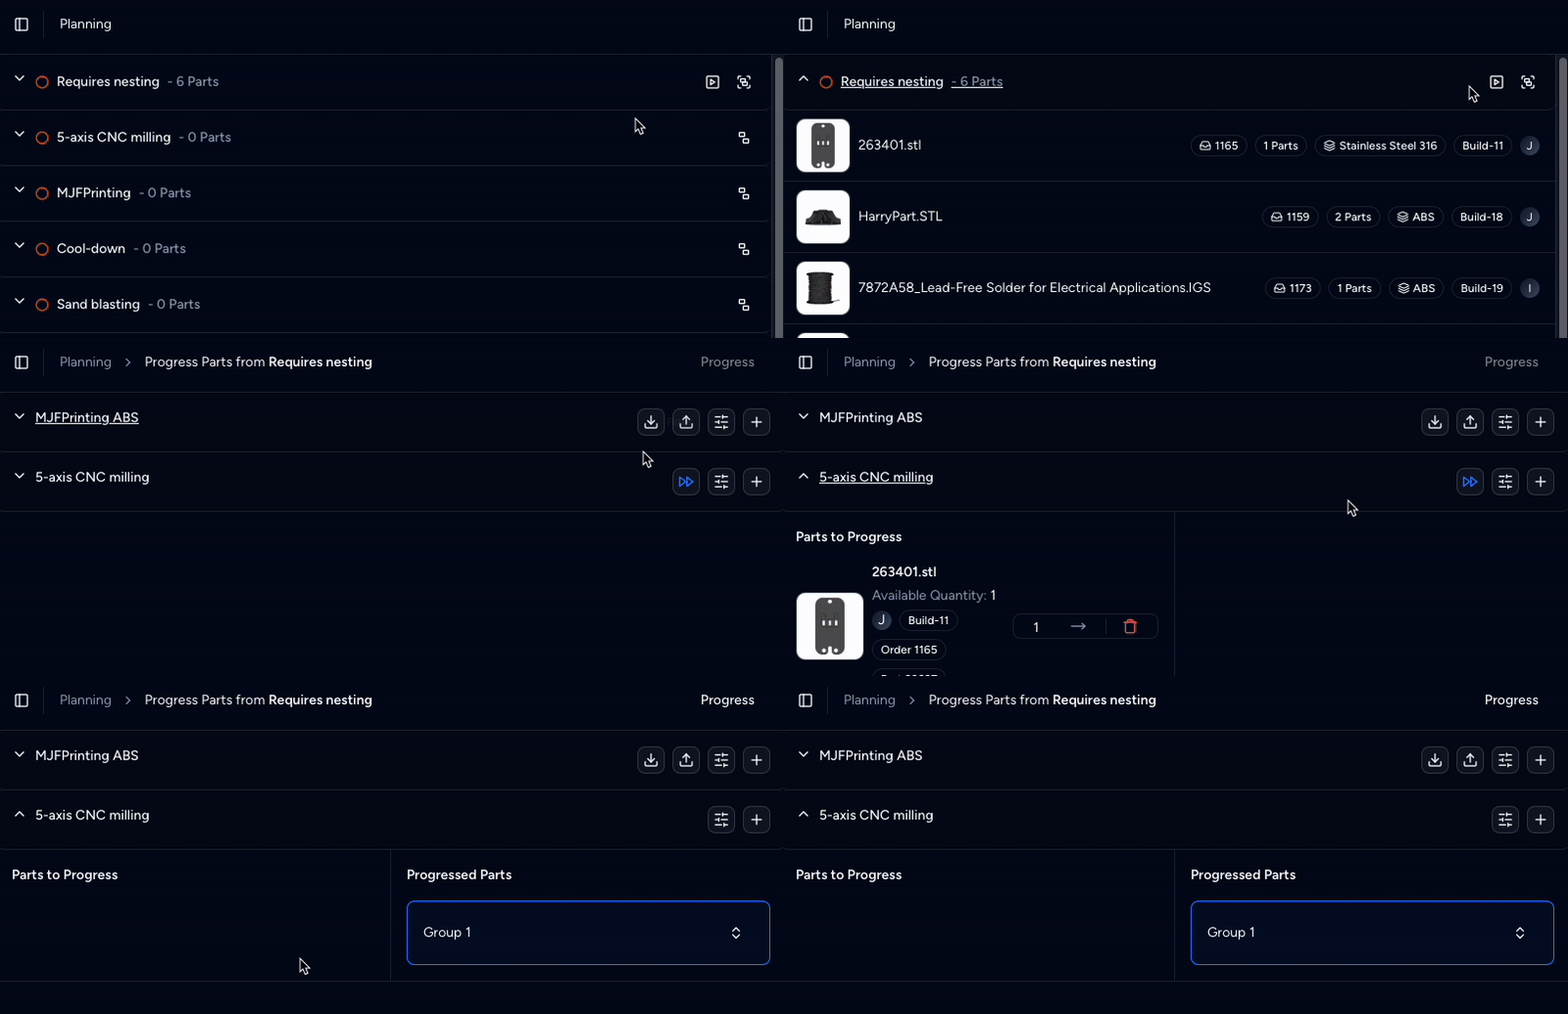
On the progress screen you can filter parts by Customer, Dispatch Date, Visits Operations, Volume, Area, Height, Width and Length to plan builds. Parts can also be grouped by order and sorted by dispatch date or volume. The Visits Operations filter is useful for grouping parts that share the same post-processing.
When parts are staged, Phasio puts them in a group for their destination automatically. To split them into more than one group, click Add Group (+) on the destination lane. See How groups form.
If the operation allows overproduction, you can move more parts out of it than its available balance. The extra quantity shows as +N next to the available quantity. See Allow Overproduction.
In Group View
- Click the green Progress Group icon [▶] on a group. This opens the build screen for that group, where you stage parts per destination operation.
Step 2. Send parts to the next operation
When you are ready, click Proceed in the header of the progress screen, next to the Undo, Redo and Reset icons. This sends every staged item to its next operation. On the build screen, the same action is the Progress N button at the top of the Outgoing rail.
If an operation has the Notify on Order Completed automation and progressing parts from it completes the work orders of one or more orders, a Work orders completed at {operation} dialog lists those orders, so you can open them or update their status before you click Continue.
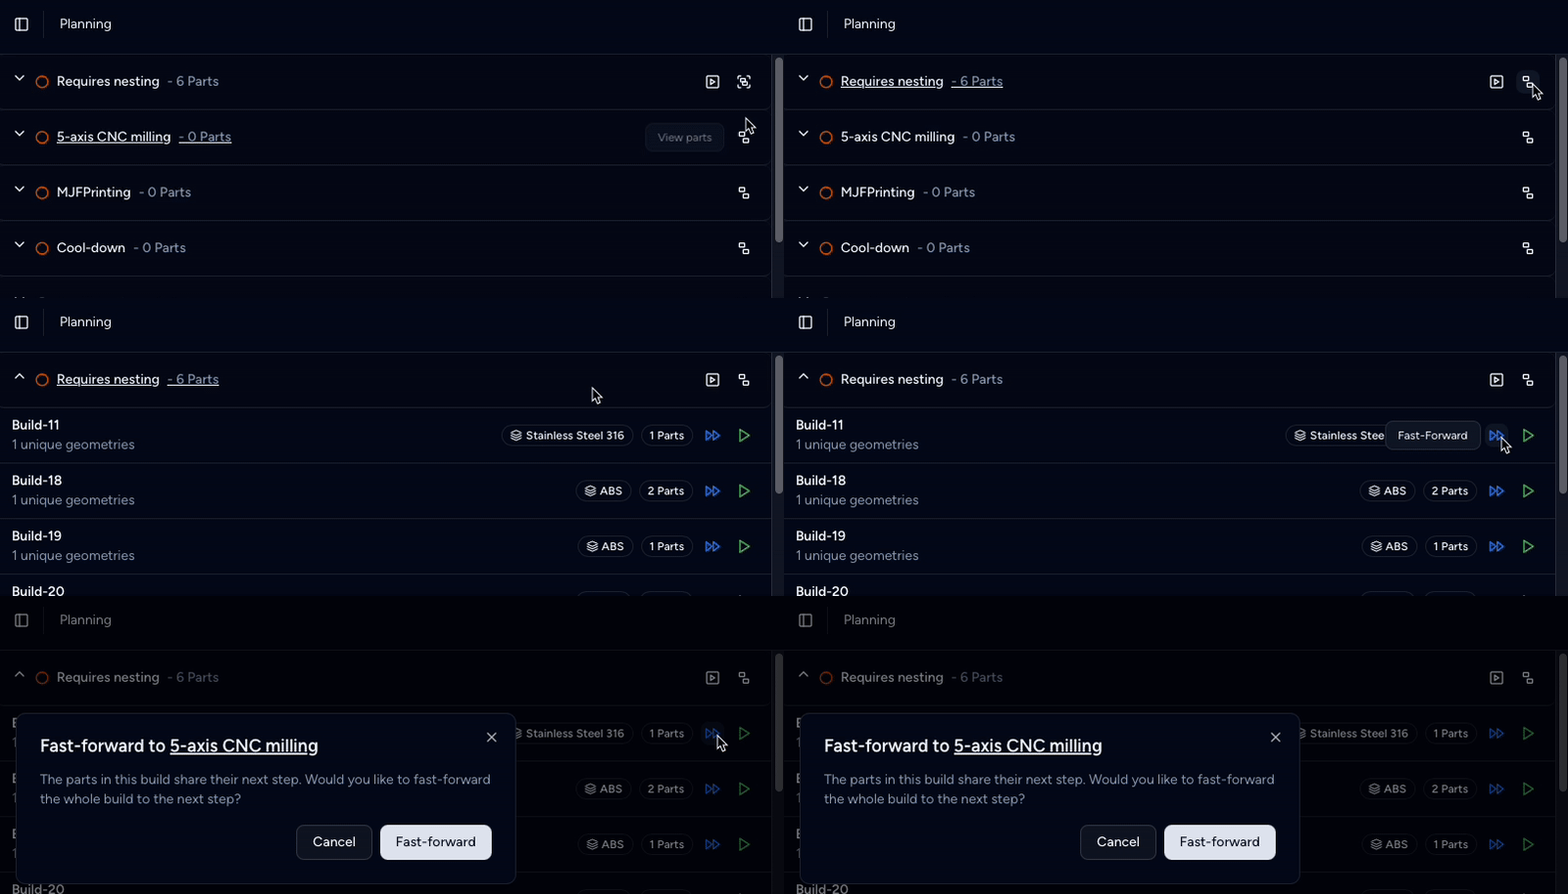
Fast-forward a group
To skip the manual steps and move all parts in a group to the next operation at once:
- Click the blue double play button [▶▶].
- In the confirmation dialog, click Fast-forward.
All parts in the group are sent to the next operation.
Fast-forward is only available when all parts in the group share the same next operation.
Operation-specific actions
Depending on the step type of the next operation, a lane on the progress screen shows extra actions:
- Download Parts: on lanes heading into a Download Parts as Group or Upload Bill of Parts operation. Opens the Download Files dialog, where you download the part files as a ZIP or CAMSPEC file for offline or third-party processing, such as nesting.
- Choose the file to download for each part: Original CAD File, Converted STL File or Production file. The dialog starts on Production file when any listed part has one. Parts without a production file get their original CAD file instead, and the dialog says how many of the selected parts that applies to. See Upload a production file.
- When downloading a ZIP, tick Keep original part name to name the files so they are easy to match to the names shown in Phasio.
- Upload Bill of Parts: on lanes heading into an Upload Bill of Parts operation. Upload a nested
.3mffile or a.csvbill of parts. Phasio stages the matching parts into a new group. Nothing moves until you click Proceed.
The build screen offers the same download and upload for its outgoing groups. See Upload a nested build file. For complete setups, see the routing examples.
Scrap parts
Scrap parts that fail during production, with a reason for quality tracking and traceability. By default Phasio schedules a replacement for every scrapped unit.
Scrapping is permanent once committed. Scrapped parts are terminal and are not sent to any operation.
Replacements
When you include a replacement, Phasio tops up the existing work order at its first operation: the replacement units join the same work order and follow the same routing from the beginning. They appear at the work order's first operation in the Backlog, not on the screen you scrapped from.
There is no data lineage connecting a scrap record to its replacement units. The replacement is a quantity addition to the existing run.
Scrap from the progress screen
- On the progress screen, click the Scrap icon [🗑️] next to the part.
- In the Scrap parts dialog, enter the details:
- A reason in the free-text field. It is optional and used for quality tracking and traceability. If you leave it blank, Phasio records "No reason provided".
- Schedule Replacement: on by default. Turn it off if you do not want a replacement.
- Replacement Quantity: shown while Schedule Replacement is on. It defaults to the scrap quantity; change it if you need a different number.
- Click Scrap. This moves the item to the Staged column for review.
- When ready, click Proceed. This commits every staged item. Parts with Schedule Replacement on are queued at the first operation of their work order's routing.
Scrap a whole group
In the Backlog group view, right-click the group and select Scrap. The Scrap group dialog has a reason field and the Schedule Replacement switch, which is on by default. The replacement quantity equals the number of scrapped parts.
Scrap on the build screen
- On the build screen, locate the part you want to scrap.
- In the row for the destination operation, click the Scrap parts (trash) icon. The Scrap parts dialog opens. The icon is only enabled while the part has pending units; unstage staged units first.
- Set the Scrap quantity. The default is 1, up to the number of pending units shown under the field.
- Schedule replacement is on by default, and the Replacement quantity defaults to the scrap quantity. Turn off Schedule replacement if you do not want replacements produced.
- Optionally, enter a reason in the free-text field. If you leave it blank, Phasio records "No reason provided".
- Click Scrap part, or Scrap N parts for more than one. The scrap appears in the Scrapped section of the Outgoing rail.
- Click Progress N to commit.
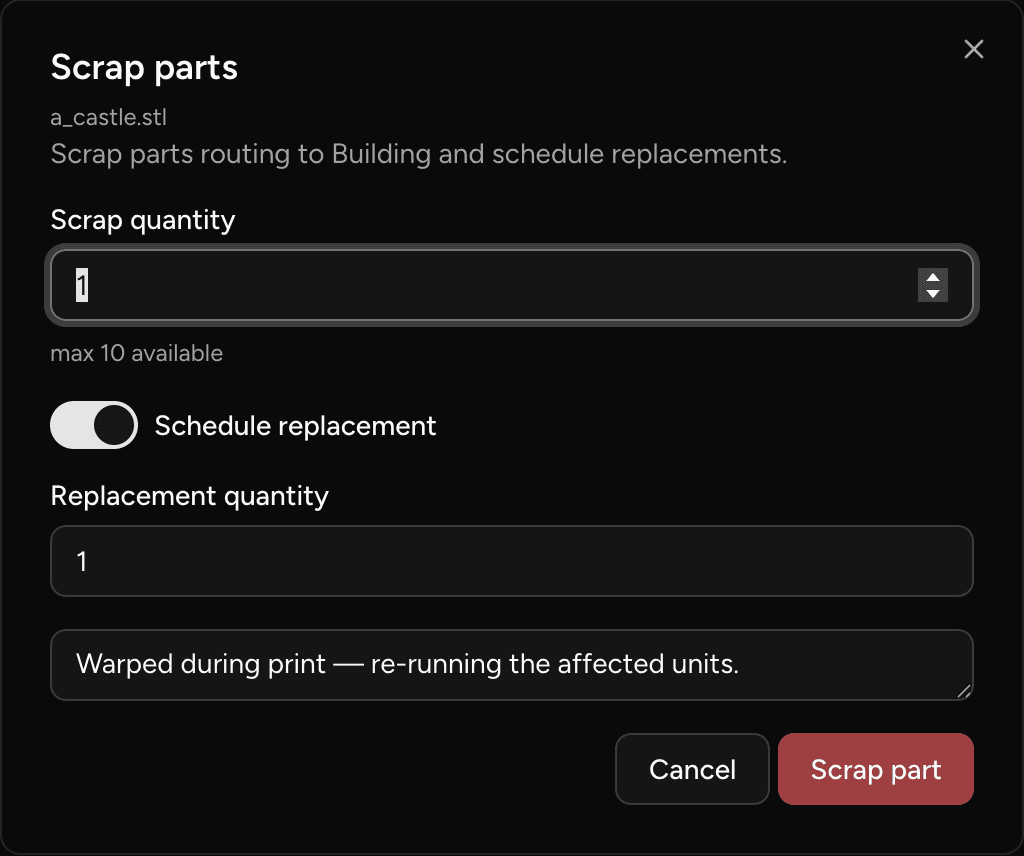
There is no undo once you progress. Before you click Progress, click Edit scrap (pencil) on the scrap in the Outgoing rail to change the quantity, replacement or reason (Update scrap), or click Undo in the Edit scrap dialog to return the units to pending.
After you progress, committed scraps move to the Progressed section of the Outgoing rail, where you can expand each one to read its reason.
Production trace
Every move is a permanent record. A part's production trace covers its entire history, from the first operation to its current position. It lays out each of the part's work orders as a row of operations, listing the groups the part has passed through at each operation, each linking to that group's build screen, and any units scrapped there.
To view the trace for a part:
- On the build screen, locate the part.
- Click the Production trace (route) icon on the part card. The trace opens inline on the card and refreshes after you progress. Click the icon again to close it.
You can also open a part's trace from the order: on the Production tab, click the Production trace icon on the part.
If a part was split, for example two units staged together and one unit staged separately, each chunk appears as its own entry in the trace, each referencing its source step and work order.
Last updated on